Building a Statamic Addon - Currency Fieldtype
Building fieldtypes in Statamic is quite straight forward once you understood how they work. However, when first starting out in building custom fieldtypes or addons you might find yourself having a hard time figuring out when to use what.
In this article we'll build a custom fieldtype "Currency Fieldtype" which provides a smooth user experience by utilizing an input mask for automated currency formatting. Since currencies are formatted differently depending on the country you're in and which currency you'd like to format, this addon makes your life a little easier because it takes care of all that for you out of the box. Feel free to check out the addon on GitHub.
If you want to learn how to make and set up an addon, take a look at Addons in the Statamic docs. Also, if you're new to Statamic and don't know what fieldtypes are you should probably check out Fields in the docs first and come back once you're ready. Getting a grasp of what the basic concepts of blueprints, fields and fieldtypes are will help you a lot in understanding this article. With that being said, let's dive in then.
How Fieldtypes Work
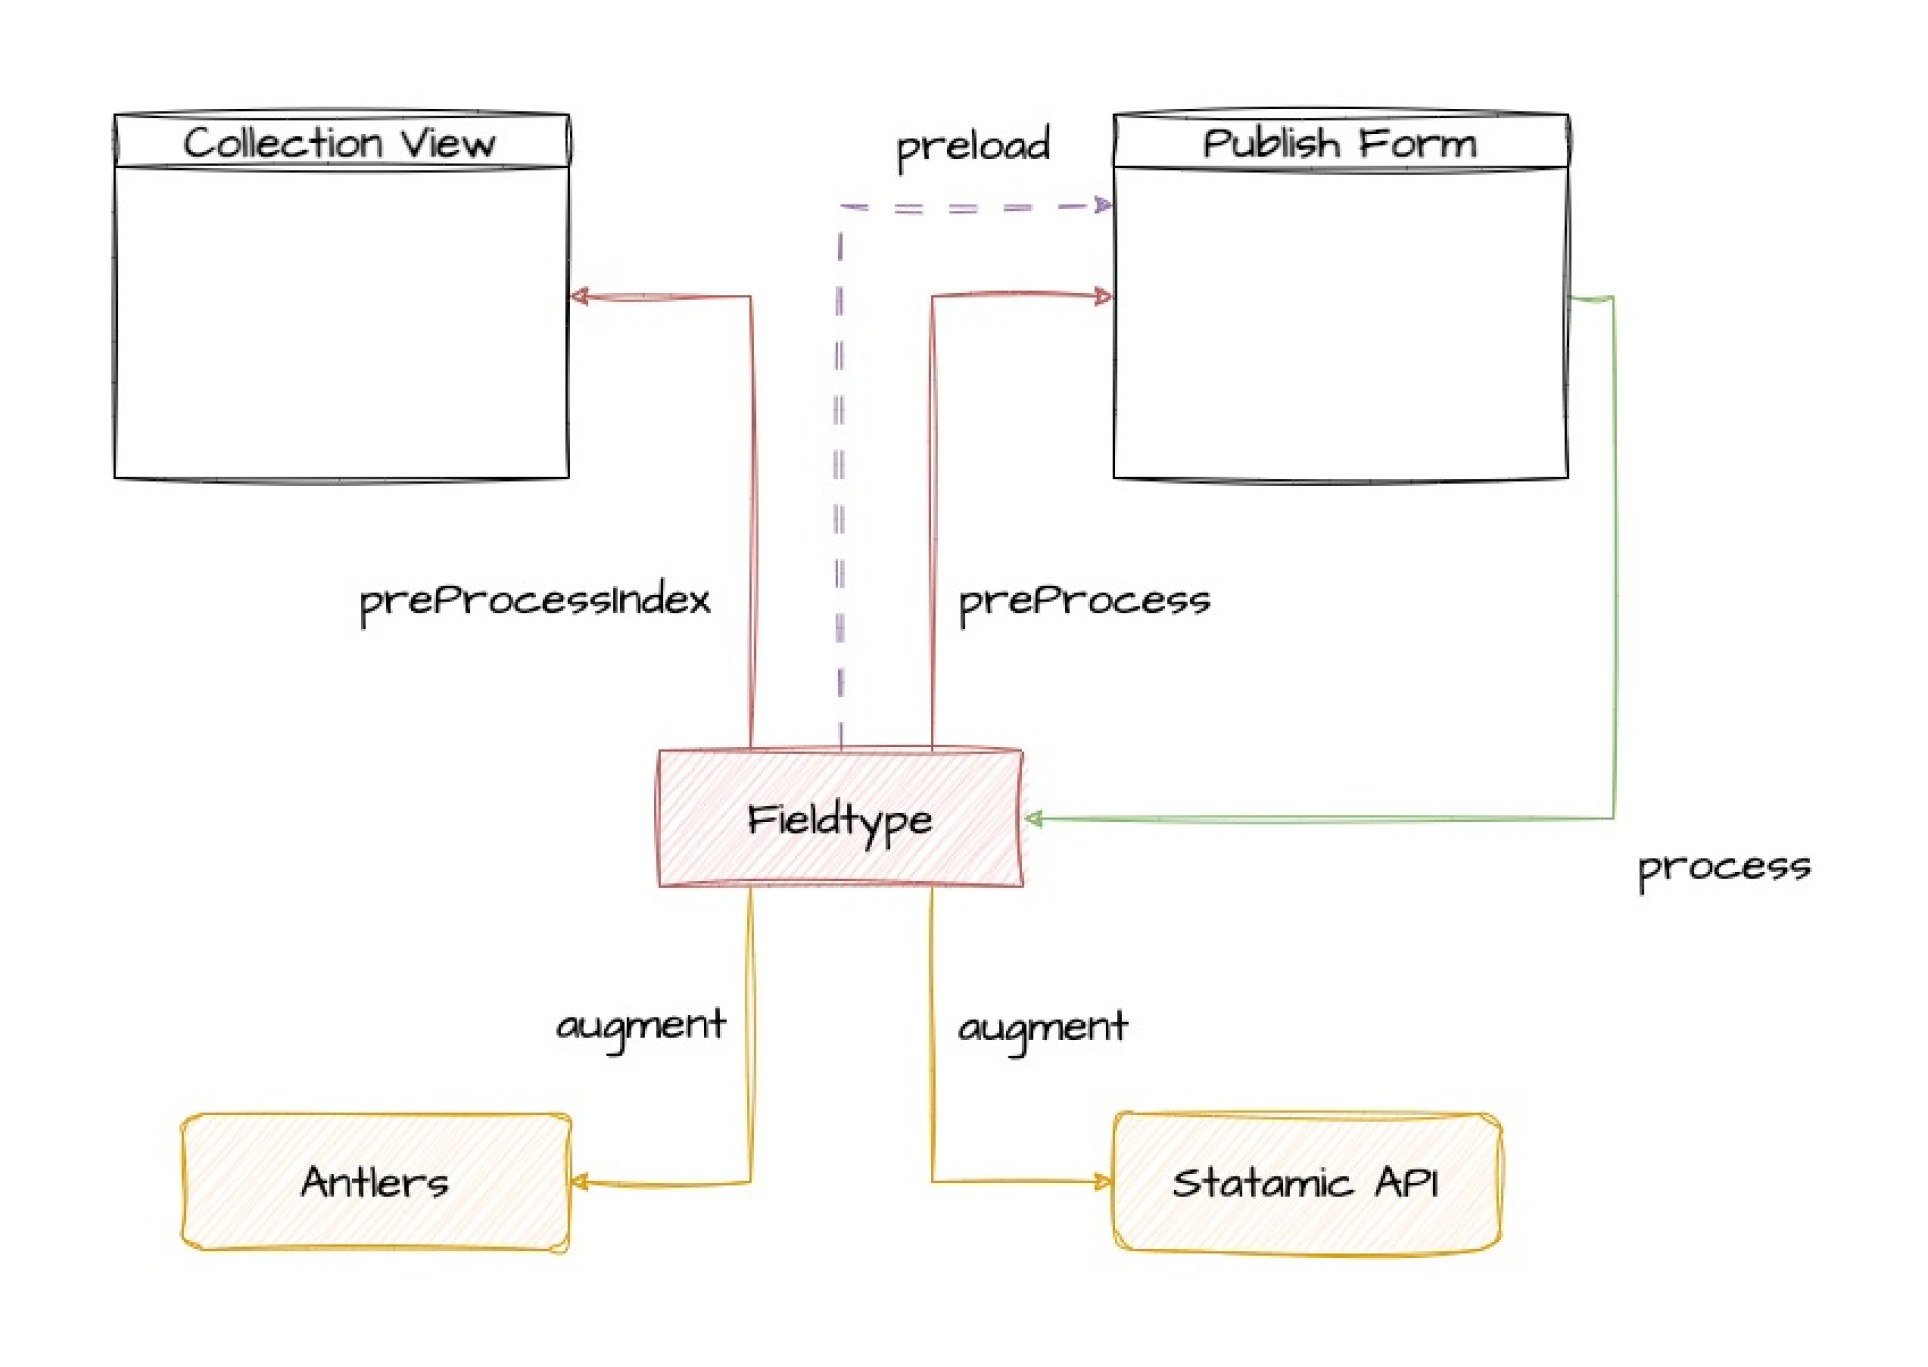
Custom fieldtypes are a very neat way to extend the features of Statamic. They live separately to the rest of the fieldtypes and you can (un)register them whenever and however you like. Understanding how they work and what the lifecycle looks like will make it way easier to code you own ones.
Fieldtypes essentially consist of two files:
a Fieldtype php class which handles all of the logic
a Vue component which is responsible for the frontend stuff when creating or editing an entry
Here is what the basic methods of a fieldtype do and how they communicate between components: I think the best way to explain what the individual components do is by using an example. Let's say we have a Blueprint
 product which has a field of our CurrencyFieldtype with the handle price. Now when we create a new product (a new entry) we can save a value for the price. So let's say we save the product with a price of $1,234.56 Dollars.
Before we start I first want to show you what my project structure looks like so you can follow which files we're editing and so on. In our Statamic project we have the following code structure for our addon:
1- addons/ 2 - doefom/ 3 - currency-fieldtype/ 4 - resources/ 5 - src/ 6 - Augmentables/ 7 - AugmentedCurrency.php 8 - Fieldtypes/ 9 - CurrencyFieldtype.php10 - Models/11 - Currency.php12 - Utils/13 - Currencies.php14 - ServiceProvider.php15 - README.md16 - vite.config.jsThe goal is so that at the end of this post you understand how building custom fieldtypes works in Statamic and are ready to build your own. So I won't go through all the files in this article, just the ones we need to get the concept.
Using the Fieldtype on the Publish Form
The publish form is what you see when you create a new entry or edit an existing one.
Here we use our Vue component to create a basic text-input (which is a Vue component provided by Statamic) with an input mask applied depending on the currency used by the fieldtype configuration. For the input mask we use Robin Herbots "Inputmask" package. This is our Vue component:
1<!-- Currency.vue --> 2 3<template> 4 <text-input 5 :value="value" 6 @input="update" 7 :id="id" 8 :append="append ? this.symbol : false" 9 :prepend="!append ? this.symbol : false"10 type="text"11 />12</template>13 14<script>15import Inputmask from "inputmask";16 17export default {18 mixins: [Fieldtype],19 mounted() {20 // Add input mask for currency fieldtype.21 const config = {22 alias: 'currency',23 groupSeparator: this.groupSeparator,24 digits: this.digits,25 }26 27 // If the currency has at least one radix point, add the radix point to the input mask configuration.28 if (this.digits > 0) {29 config.radixPoint = this.radixPoint;30 }31 32 // Apply the input mask to the currency field.33 Inputmask(config).mask(this.id);34 },35 computed: {36 /**37 * The id of the input field.38 * @returns {string}39 */40 id() {41 return 'currency-input-' + this.meta.handle;42 },43 /**44 * Returns the symbol for the currency input.45 * @returns {string}46 */47 symbol() {48 return this.meta.symbol49 },50 /**51 * Returns true if the currency symbol is appended to the input, false otherwise.52 * @returns {boolean}53 */54 append() {55 return this.meta.append56 },57 /**58 * The radix point symbol to use.59 * @returns {any}60 */61 radixPoint() {62 return this.meta.radix_point63 },64 /**65 * The group separator symbol to use.66 * @returns {string}67 */68 groupSeparator() {69 return this.meta.group_separator70 },71 /**72 * The number of decimal digits.73 * @returns {number}74 */75 digits() {76 return this.meta.digits77 },78 },79};80</script>The input mask works by enforcing a certain pattern on the string that's entered into the input field. For example when a user is in the US and types 1234.56 the input mask will add a group separator at the proper place. So then the input field has a string value of '1,234.56'. However, if the user were to visit the German version of the site, the fieldtype would output '1.234,56' instead.
We get the group separator and radix point and other information by passing them along to the Vue component with the `preload()` function of the fieldtype. This makes the passed data available using this.meta.[...] as shown above.
1// CurrencyFieldtype.php 2 3/** 4 * Preloads necessary currency data for the fieldtype's Vue component. 5 * 6 * @return array Array containing symbols, grouping and radix information. 7 */ 8public function preload(): array 9{10 $fmt = App::make(NumberFormatter::class, ['iso' => $this->getIso()]);11 12 return [13 'symbol' => $fmt->getSymbol(NumberFormatter::CURRENCY_SYMBOL),14 'append' => str_ends_with($fmt->getPattern(), '¤'),15 'group_separator' => $fmt->getSymbol(NumberFormatter::GROUPING_SEPARATOR_SYMBOL),16 'radix_point' => $fmt->getSymbol(NumberFormatter::DECIMAL_SEPARATOR_SYMBOL),17 'digits' => $fmt->getAttribute(NumberFormatter::FRACTION_DIGITS),18 'handle' => $this->field()->handle(),19 ];20}The NumberFormatter used in this code snippet is a class provided by PHP. I've created a binding in the ServiceProvider.php so I don't have to instantiate and configure it over and over again. Just in case you wonder what's happening here.
1// ServiceProvider.php 2 3class ServiceProvider extends AddonServiceProvider 4{ 5 6 ... 7 8 public function register() 9 {10 $this->app->bind(NumberFormatter::class, function (Application $app, array $params = []): NumberFormatter {11 if (!Arr::has($params, 'iso')) {12 throw new InvalidArgumentException('The required iso key is missing in params array');13 }14 15 $style = Arr::get($params, 'style', NumberFormatter::CURRENCY);16 $iso = Arr::get($params, 'iso');17 18 $fmt = new NumberFormatter(Site::current()->locale(), $style);19 $fmt->setTextAttribute(NumberFormatter::CURRENCY_CODE, $iso);20 21 return $fmt;22 });23 }24 25 ...26 27}process() - Saving the Entry
When an entry is saved the value is sent to our fieldtype class and processed before saving. You can do all sorts of stuff in the process method. In our case, all we want to do is convert the string '1,234.56' to a float 1234.56.
1// CurrencyFieldtype.php 2 3/** 4 * Process the data before it gets saved. 5 * 6 * @param mixed $data 7 * @return array|mixed 8 */ 9public function process($data)10{11 $fmt = App::make(NumberFormatter::class, ['style' => NumberFormatter::DECIMAL, 'iso' => $this->getIso()]);12 $fmt->setTextAttribute(NumberFormatter::CURRENCY_CODE, $this->getIso());13 $float = $fmt->parse($data);14 15 return $float === false ? null : $float;16}After all this, in our [slug].md file we should have: price: 1234.56
preProcess() - Editing an Entry
As explained above, the input mask enforces a certain pattern on the input field so we always end up with a properly formatted string. This process works vise versa as well. If we set the value of the input field programmatically it expects the value to be a formatted string instead of a float value.
So when we edit an entry, Statamic will fetch the value stored in our Markdown file and pass it to the Vue component. Since the input mask expects a string and not a float (as we stored it), we utilize the CurrencyFieldtypes.php method preProcess(). In our example we have a value of 1234.56 to be displayed in the publish form. What we want to end up with is a string of '1,234.56' so the input mask can handle it. This is what our method looks like:
1// CurrencyFieldtype.php 2 3/** 4 * Pre-process the data before it gets sent to the publish page. 5 * 6 * @param mixed $data 7 * @return string|null 8 */ 9public function preProcess($data): ?string10{11 if ($data === null) {12 return null;13 }14 15 $fmt = App::make(NumberFormatter::class, ['iso' => $this->getIso()]);16 $formatted = $fmt->formatCurrency($data, $this->getIso());17 $symbol = $fmt->getSymbol(NumberFormatter::CURRENCY_SYMBOL);18 19 return trim(str_replace($symbol, '', $formatted));20}preProcessIndex() - Displaying the Field Value in the Collection View
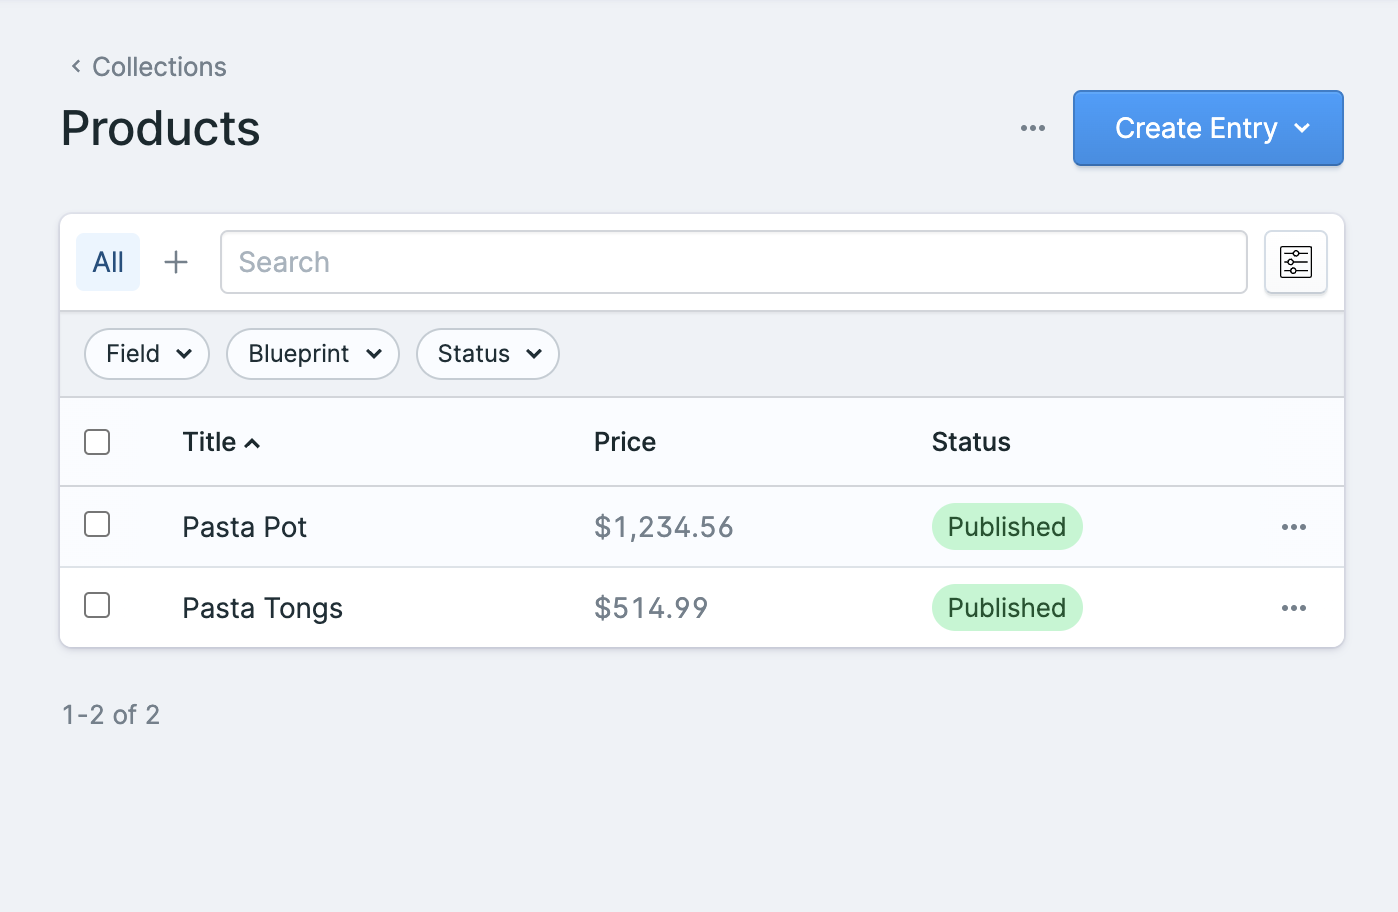
As you can pre process the field value before sending it to the publish page, you can also pre process the value before sending it to the collection view. This is useful if the value is not meant to be displayed as is and should be altered in some way first.
In the case of our currency fieldtype we want to convert the float value to the properly formatted currency string including group separators, radix point and of course the currency symbol. Here's what we do:
1// CurrencyFieldtype.php 2 3/** 4 * Pre-process the data before it gets sent to the collection view. 5 * 6 * @param $data 7 * @return string|null 8 */ 9public function preProcessIndex($data): ?string10{11 if ($data === null) {12 return null;13 }14 15 $fmt = App::make(NumberFormatter::class, ['iso' => $this->getIso()]);16 17 return $fmt->formatCurrency($data, $this->getIso());18}In the collection view the column "Price" then looks like this:
 And we're done!
Have Fun Building Your Own Custom Fieldtype
Hope you learned something working through this guide. For me the beginning was hard because it took me quite a while to understand the data flow of fieldtypes and to know which component process which data at what point in the lifecycle.
Have fun and best regards
Dominik